How to build Enter & Exit Signs
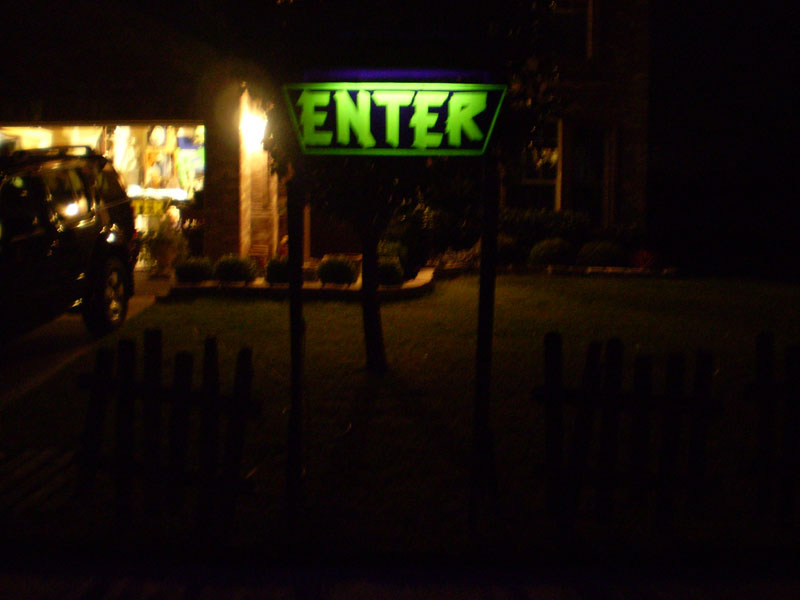
Instructions on how to make black light ready Enter & Exit Signs for your Haunted House or Yard on Halloween. Combine them with old fence panels for a professional haunted look. Easy to build and easy to store away for the rest of the year.
Skill Level: Medium
Approximate Time: 4-6 hours per sign
Approximate Cost: $30 - $35 (US) per sign
Dimensions: 40" W x 96" H x 12" D
Last Updated: October 20, 2008
READ OUR DISCLAIMER BEFORE ATTEMPTING ANY PROJECTS ON THIS SITE.
HOW TO HALLOWEEN IS ONLY LIABLE FOR TWO IDIOTS, AND NOBODY ELSE.
Getting Started
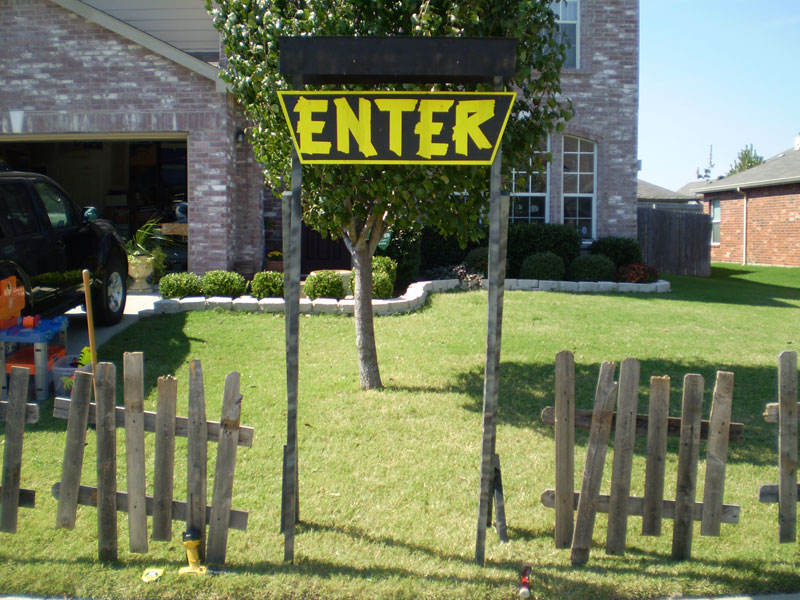
Enter and Exit signs add a great dramatic presence to your haunted house or yard. When used in combination with our old fence panels, they complete an environment that becomes both functional and cool to look at. Once you build one, simply repeat these steps to create the second to complete an entrance and exit way to your haunted house or yard. Our first entrances were built in just a few hours, but were overkill for the amount of lumber that we used to get the job done. This design minimizes the amount of materials you need for each one in order to reduce the cost (and weight) to build one, but maintain structural integrity since people will be going through and under the structure.
The steps for this project are organized into four main sections:
- Building the signage
- Building the entrance structure
- Installing the structure and sign
- Removing the structure and sign
The great thing about these signs isn't just the look they add to the front of your environment, but the fact that they can break down to almost nothing to minimize storage needs, and be durable enough to last a few weeks in bad weather conditions.
Be sure to read this entire set of instructions before even walking into the garage or workshop. In doing this, you can familiarize yourself with the steps involved, and better prepare for production.
Before we jump right in to this project, remember one thing: DON'T WORRY ABOUT PERFECTION! With some exception on the cuts for the wood, this particular project actually looks much better if you don't concentrate on being too precise. Most Halloween decorations that are created in this manner tend to look more "authentic" since they are not meant to look precise, but old and used.
Tools You Will Need
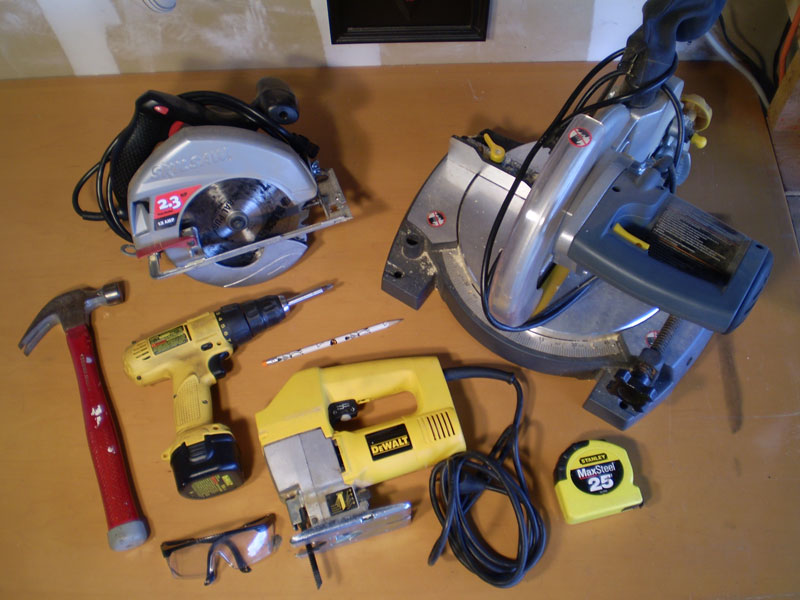
Required Tools
- Pencil
- Tape Measure
- Drill w/Philips-head Screw Bit
- Circular Saw
- 1/8" drill bit
- Safety Goggles
- Ladder (not shown)
- Saw Horses or Large work space (not shown)
- Hammer/Mallet/Sledge Hammer (not shown)
Optional Tools
- Miter Saw
- Jigsaw (if doing elaborate design for signage)
Materials You Will Need
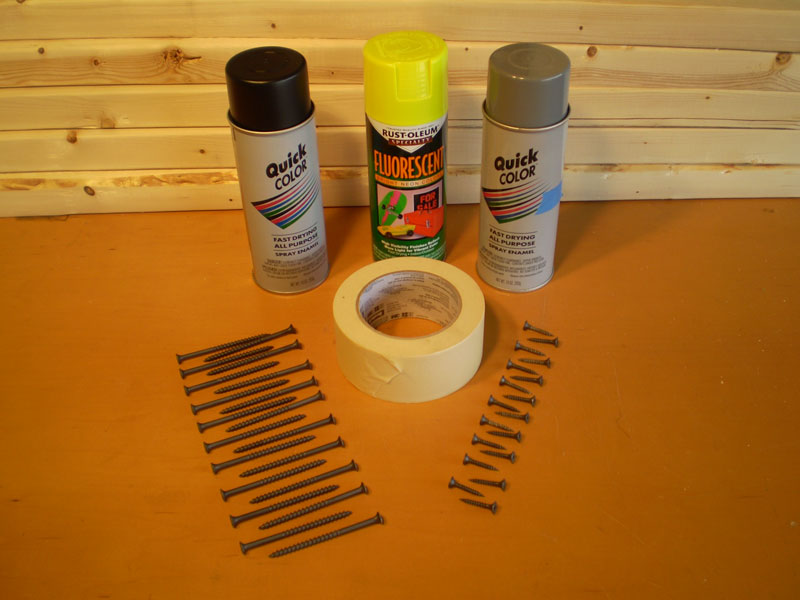
- (18) 1" Screws
- (14) 2.5" Screws
- (5) 2" x 3" x 8ft KD White Wood Studs
- (1) Sheet of 1/4" 4ft x 8ft Plywood (not shown in photo)
- (2-3) Cans Spray Paint – Flat Black
- (1) Can Spray Paint – Flat Gray
- (1) Can Spray Paint – Fluorescent Yellow, Green, or Orange
- (1) Roll of 2" wide Masking Tape
Building the signage
Step 1 - Measuring and cutting the signage
- First measure a rectangle on the plywood that is 40" wide and 12" tall. These are the dimensions we will want to stay within to keep our "Enter" or "Exit" sign from taking up too much space for the actual height of the entrance. Start with a corner of the plywood piece so you will only have to make two marks for cutting. (photo and diagram)

- Make the cuts with your circular saw by simply following the lines from each side. In our example, you will only need to make two separate cuts.
- On the piece that was just cut out, draw the outline you would like the shape of your signage to be. For this example, we will use a trapezoid type of design.

- Next, cut out the design that you have drawn. You'll need a jigsaw if you have chosen to make a complex design. In our example, we can use the circular saw to make the trapezoid. Your sign is now ready for painting.

Step 2 - Painting the signage
- Once you have cut out the shape of your sign, paint the entire front of the piece (side that will actually show the letters) with two to three solid coats of the fluorescent spray paint as it is fairly transparent when spraying light coats. We recommend using the yellow or green for "Enter" signs and using orange for "Exit" signs.

- Once the coats of paint are completely dry and able to take pressure without smearing or smudging the paint (we recommend at least 1 hour), you will tape off the sections that will REMAIN fluorescent. In this example, we will keep the outer edge and letters of the sign fluorescent by taping them off.
- To tape the outer edge of the sign, simply take the roll of 2" wide masking tape and place a portion of the width along the edge of the sign. In this example we will only place about 1/2" on the edge of the painted sign. You can fold the corners of the tape down, but don't fold them down over the back or edges of the plywood. This will allow you to easily paint the back of the sign without cover the fluorescent portions.

- Next, create the letters for the sign text. In this case, we're creating an "Enter" sign, so we will start by creating the "T" of "Enter" in the middle of the sign to make sure we have enough room for all of the letters. We create the "T" out of two pieces of ripped masking tape. The more ripped the pieces of tape are for each letter, the better the effect will be to create a rough font for the sign.

- Continue taping out the letters on each side from the "T" until you fill the width of the sign with your completed word.

- Once everything that you would like to be fluorescent is taped off, cover the entire sign with the flat black spray paint. Be sure to paint thin coats so no paint pools up around the tape. It will allow you to pull the tape off easier as you can actually tear thick coats of paint off with the tape.

- When dry, you can paint the back of the sign if you wish. Be sure you paint the edges of the plywood by spraying down and remember to be careful not to cover the front edges that are fluorescent (if you chose to tape them).
- After the black coat is dry to the touch, carefully pull the tape off to reveal the fluorescent letters and trim of the sign.

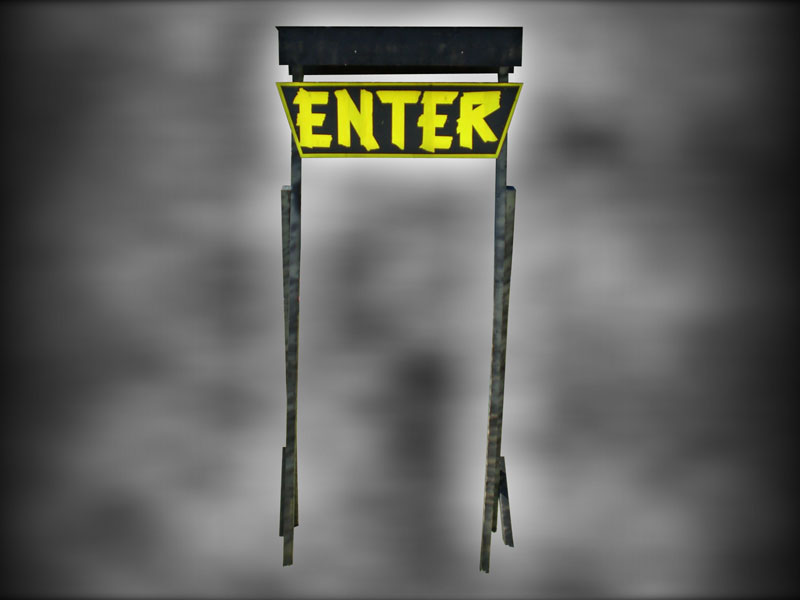
- Here is what the finished sign should look like. We're now ready to dive into building the entrance structure.

- NOTE: While waiting for coats of paint to dry, you can begin production on the "Building the entrance structure" section of this how to. This will allow you to build the signs in less time.
Building the entrance structure
Step 3 - Measuring and cutting the structure frame
- Let's start with the 2x3 studs. Two of them will 8 feet in length, but will have stakes cut on one end of each stud. To do this, measure up 4" from one end of a stud and mark a line that is the entire width.
- Next, make a mark at the very end of the stud that is half of the width of the stud, or 1 1/4" in this case.
- Draw a line from the center to one end of the 4" mark. Draw a line from the center mark to the other end of the 4" mark. The result should be a point that you will cut out to form the stake of the stud.

- Make the cuts with your circular saw.

- Repeat these steps for the second stud.
- On another two of the five studs, measure 24" from one of the sides and make a mark on each stud. This will give us a piece that measures 24" and a piece that measures 72" from each stud.

- Take the two 24" pieces and make them into stakes by following the same process of making a 4" mark, 1 1/4" center mark and connecting them just like you did for the 8 foot stakes.

- On the final stud, measure in from one end and make marks at 32", 44" and 56". This will give us the following pieces from this stud:
- (1) 32" piece
- (2) 12" pieces
- (1) 40" scrap piece
- Make the cuts with your circular or miter saw. You are now ready to assemble the structure frame.
Step 4 - Assembling the structure frame
- Start by measuring 25" from the top of the 8 foot stud (uncut side).

- Stack a 72" stud right on top of the 8 foot stud starting at the 25" mark. There will be a little overlap at the far ends of the stud.

- Measure two center marks on the 72" stud. The first will be 1 1/4" from the top of the stud, and the second will be 1 1/4" in the middle of the stud (measured from one of the sides) to create a center point of where to put the screw.

- Next, drill a pilot hole at the mark you just made on the 72" stud while it is still sitting flush on top of the 8 foot stud. For the 2.5" screws, we are using a 1/8" drill bit.

- Screw in one of the 2.5" screws. You now have one side of the structure that can swing apart.

- Repeat the process for the remaining 8 foot and 72" studs to complete the other side of the structure.

- Measure down from the top of the 8 foot stud and make a mark at 12 3/4" on the inside (side that the 72" stud IS NOT attached). Repeat for the other 8 foot stud.

- On the outside of the 8 foot stud (side that the 72" stud IS attached), measure from the top and make two marks at 13 1/2" and 14 1/2". Repeat for the other 8 foot stud.

- Take the two sides of the entrance and place them on a large flat surface, like a garage floor. Make sure that the attached 72" studs are on the outside of the entrance and not the inside.

- Align the 32" stud between the 8 foot studs so that it lies on its widest side with its top lining up with the 12 3/4" marks.

- On the outer 13 1/2" and 14 1/2" marks of one 8 foot stud, measure up 3/4" from the bottom on each mark and drill a pilot hole with the 1/8" drill bit. Be sure to firmly hold the 32" stud against the 8 foot stud when drilling the holes. Repeat for the other 8 foot stud.
- Screw the 8 foot stud to the 32" stud in the pilot holes you just drilled with 2 1/2" screws. Repeat for the other 8 foot stud.
Step 5 - Measuring and cutting the black light box
- a. Start by measuring out three rectangles on the remaining portion of the plywood, directly underneath the piece that was cut out for the sign. You will measure the following rectangles:

- (1) 39" wide by 13" high rectangle (top of the black light box)
- (2) 38" wide by 6" high (front and back of the black light box)
- Once you've measured out the pieces, make the cuts with your saw. You will have quite a bit of plywood left, especially enough to make a second complete sign.

Step 6 - Assembling the black light box
- Gather the two 12" stud pieces along with the 3 pieces that you just cut. These five pieces will create the black light box.
- Take one of the smaller plywood pieces and line up the outer edges with the 12" stud pieces. Screw in two 1" screws for each 12" stud to fasten the plywood. Repeat for the other side with the other small plywood piece.


- Then, flip the piece over so it stands on the small plywood pieces and the 12" studs are at the top.

- Next, take the large plywood piece and using your best estimate, center it on top of the piece you just assembled. Screw the large piece of plywood to the studs with (2) 1" screws on each side.


- Go ahead and paint every surface (inside and out) of the finished black light box with flat black spray paint. At this point, the rest of the painting is pretty much just for base covering, so you do not need solid thick coats. Light and splotchy coats will actually make the pieces look aged.
- Once dry, it will be ready to attach to the entrance structure frame.
Step 7 - Attaching the black light box
- First, measure a shorter side of the black light box and make a mark in the center of its width. Do this for the other shorter side as well. This will be the center line that you will want to line up the center of the 8 foot stud with.

- You will need a second person to help you with this step. Lay the black light box, top down, on the floor and place the top of the 8 foot studs inside it. Line up the first side by centering the 8 foot stud with the mark you made on the black light box. WATCH OUT for the 72" pieces that are connected with only one screw, they can fall down! You can lay them down so they rest on the ground, but you will still need someone to hold the structure frame while you fasten the box to it.

- Drill two pilot holes for two screws on each side.

- Fasten the box to the frame with two 2 1/2" screws on each side.

- You are now ready to paint the entire structure.
Step 8 - Painting the entrance structure
- To paint the structure, stand it upright so the black light box is back at the top. You can tighten the pivot screws a little more for this step after opening the frame up to help make it a bit more stable.

- Start with the black spray paint and go back and forth across the frame quickly just barely covering portions of the wood. When you are done, it will basically look like a bunch of zig zags on the frame.
- Next, do the same thing with the gray spray paint, but fill in the parts of wood that did not get covered with black. This is a quick way to make a little paint go a long way and still have some sort of "old and weathered" look.
- Be sure to paint the 24" stakes as well in the same manner.
- Let the frame and stakes dry and then it's time to install the sign.
Installing the structure and sign
Step 9 - Installation Preparation
- There are a few things that we'll do to get the sign ready for installation. The first is to attach the sign to the structure with six 1" screws. It's easier to do this on the ground so there are holes to hang the sign when the structure is installed upright.
- Measure down 8 inches from the top of each 8 foot stud. This is where the top of the sign will line up for attachment.

- Next, drive two of the 1" screws on each side of the sign that overlaps the 8 foot studs.

- Drive two 1" screws into the middle of the sign that overlap the 32" stud. This is the stud that connects the two 8 foot studs together.
- Now we must remove the sign and black light box so you can install the structure without damaging the pieces.
- To remove the black light box, just remove the 4 screws on the two side 12" studs. This will leave the box intact and make it easier for mounting.

- The final step of preparation will be adding the black light to the black light box. A 24" black light is recommended to provide enough light for the sign effect. Since black lights vary on how they are installed, follow the instructions for mounting your black light to attach it to the inside front of the black light box.
- For our black light, it requires two screws spaced apart that line up with two holes to mount the black light.

- Once you've mounted the black light to the front inside of the black light box, remove it as you're ready to install the structure.
Step 10 - Structure placement and installation
- For this step, you'll need a second person, a ladder, and hammer, mallet or sledge hammer. IMPORTANT: Prior to installation, take the 30 minutes or so to call as many utility companies as you can to ensure there are no electric, cable, phone, water lines, etc., where you plan to install the sign and structure. Doing this will save you the time, money, and trouble of broken lines. TRUST US.
- Set the sign structure up in your desired location and pull back 72" studs for support so frame is straight up and ensure that the inside between the bottom of the two 8 foot studs measures 32".

- On the ladder, drive the 8 foot studs into ground with your hammer, mallet or sledge hammer until all 4 inches of the staked ends are driven into the ground.
- If needed, reposition the 72" studs so the 8 foot studs are perfectly upright when resting back on the 72" studs.

- With your hammer, mallet or sledge hammer, drive one 24" stake into ground right next to the "outside" of each 72" stud. Placing them on the outside of these studs helps ensure that trick-or-treaters don't accidentally trip on them while walking through the structure.

- Screw each 72" stud to the stake from the inside with two 2.5" screws for each 72" stud.


- Shake the structure a bit to ensure that you don't need to drive the 8 foot studs down any deeper. While there will be some wobble to the structure, it should be strong enough to even take an accidental bump from an adult.
Step 11 - Finishing touches
- Reattach the black light box.

- Reattach the black light to the black light box.

- Reattach the sign with the six 1" screws.

- Tie or staple the cord to the outside of the frame if you want. We simply wrap the cords and tie the end of the black light cord and extension cord around the frame so we don't have to remove staples every time.


Removing the structure and sign
Step 12 - Removal
- For removal of the structure and sign, simply remove the sign, black light, black light box, 24" stakes, and then the structure. For best results, try lifting the structure straight out of the ground to minimize the size of the hole it will leave.
- As with the old fence panels, we go in behind the removal and fill in the holes with dirt. Every year, the grass grows right back over it and we never see the holes from the year before.
Step 13 - Storage
- For storage, simply remove the 32" brace from the structure and store away with the black light box, sign and structure sides. You can dissemble the black light box if you wish, but it is not necessary.